Sign up
The most common way to add users to Managed IoT Cloud is to use the User API to either create users from AppBoard or from a third party application. It is however possible to enable self sign up to Managed IoT Cloud and this guide describes how that works in AppBoard and how third party applications can integrate sign up flows in their own applications.
Enable sign up
Sign up can be enabled by contacting Telenor Connexion. There are two levels of sign up:
- The users can sign up to the system but an administrator must approve the user by setting the role and the domain of the user.
- The user can sign up to the system and is automatically assigned a sandbox domain where the user have full access. The system creates a new domain as part of the sign up and this is the domain that the user gets access to. The generated domains can be placed anywhere in the domain hierarchy and you specify the parent that you want when you contact Telenor Connexion to enable sign up.
Sign up flow
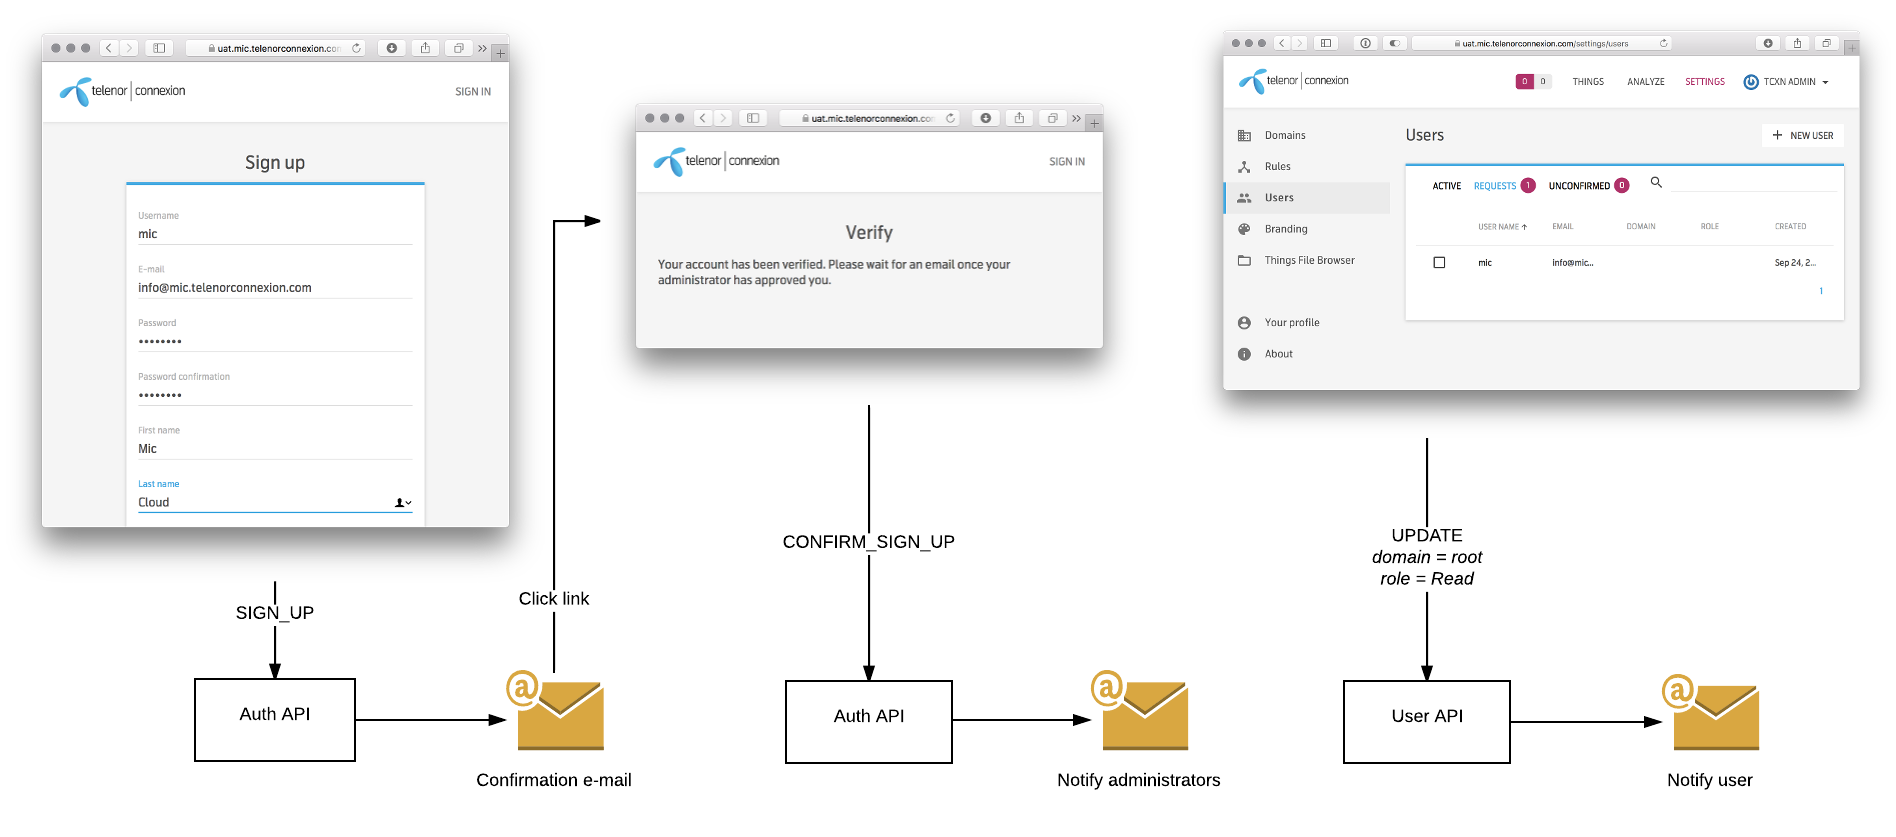
The image below shows the sign up flow.
-
The user visits the sign up page (
/signupfor AppBoard), enters all the information required and presses SIGN UP.- The application calls the
SIGN_UPaction on the Auth API and shows a message telling the user to check their e-mail. - The system creates a user with a “UNCONFIRMED” status and an e-mail is sent to the user with a link to confirm the account. (This step is needed to confirm the e-mail, otherwise we would not be able to send password resets to the user later.)
- The application calls the
-
The user clicks the link to confirm the e-mailaddress.
- The application gets the token from the url and passes the token to the
CONFIRM_SIGN_UPaction on the Auth API. - The system sets the user as confirmed and sends an e-mail to the administrators (all Read/Write uses in the root domain) to notify them that a new uses needs to be assigned a domain and role.
- The application gets the token from the url and passes the token to the
-
An administrator login to the system and sets the domain and role of the user. (This step is not necessary if sign up is configured to automatically assign a sandbox domain to the user.)
- The application calls the
UPDATEaction on the User API with the domain and role. - The system updates the user and sends an e-mail to the user notifying the user that the account is ready to be used.
- The application calls the
Extension points for implementing a custom solution
To implement the sign up flow in your own application the flow above provides a number of extension points that you can use.
- The page or form where the user enters their information can be obviously be one in your own application. Call the Auth API with the required information. The e-mails that the system will send can be customized as described in the Custom Email Templates Guide.
- When the user recieved a link it will by default point to an AppBoard url. If you want the user to stay in your application you need to setup your own confirmation endpoint. Note you should first change the publicUrl to your own host url which is described in the Cloud Rest API, Create or Update domain API. The full url of confirmation link will be
${url}/verify?token=${token}so you must provide a url where/verify?token=${token}can be appended and then extract the token from the url and pass that to theCONFIRM_SIGN_UPaction.
While not a part of the sign up flow itself you may also want to provide a way for your users to get a new password if they forget it. This is done by calling the FORGOT_PASSWORD action of the Auth API. The user will receive a link, just like in the sign up flow, that ends in /setPassword?token=${token}. So you will need to create an endpoint for this as well and pass the token to SET_PASSWORD in Auth API.
For more information about the API endpoints, check the Auth API.